Two Infinity & Beyond! A Toy Story Birthday Party Filled with DIY Magic
Toy Story Birthday Party Theme: Why It’s Perfect for Toddlers
Planning a Toy Story birthday party and need some fun, creative DIY ideas? You’re in the right place! From out-of-this-world decorations to themed snacks and cupcakes, I’ve got everything you need to throw a “Two-Infinity and Beyond”celebration.
“Two Infinity & Beyond!” – Our Toy Story 2nd Birthday Party Setup
When our son turned three, we went all out with a Toy Story-themed birthday, and let me tell you—it was magical! In this post, I’ll walk you through the DIY decorations, the dessert table setup, and all the exciting activities that made this party one to remember. Get ready for some easy, budget-friendly ideas that’ll have your little Space Ranger grinning from ear to ear!

Toy Story Birthday Decorations That Wow (Without Blowing Your Budget)
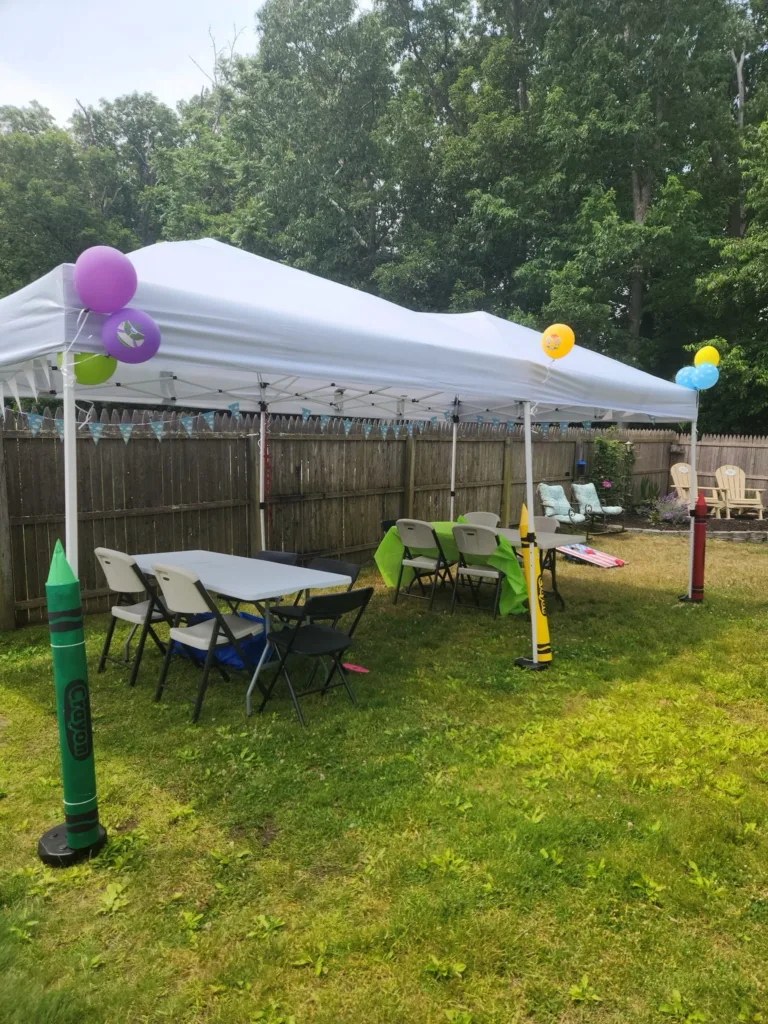
To make this Toy Story birthday party feel like stepping straight into Andy’s room, we went big—literally! Our goal was to create oversized decorations that made everyone feel toy-sized, just like Woody, Buzz, and the gang.
My absolute favorite DIY projects? The giant crayons and the wooden block tower! These larger-than-life props added so much character to the party, but we also mixed in some fun store-bought decorations to tie everything together.
A Toy Story birthday banner and a few character balloons instantly brought the theme to life and made decorating a breeze. The combination of handmade and store-bought elements gave us the perfect balance of creativity and convenience!
Now, let’s get into how you can make those oversized crayons and block towers yourself!
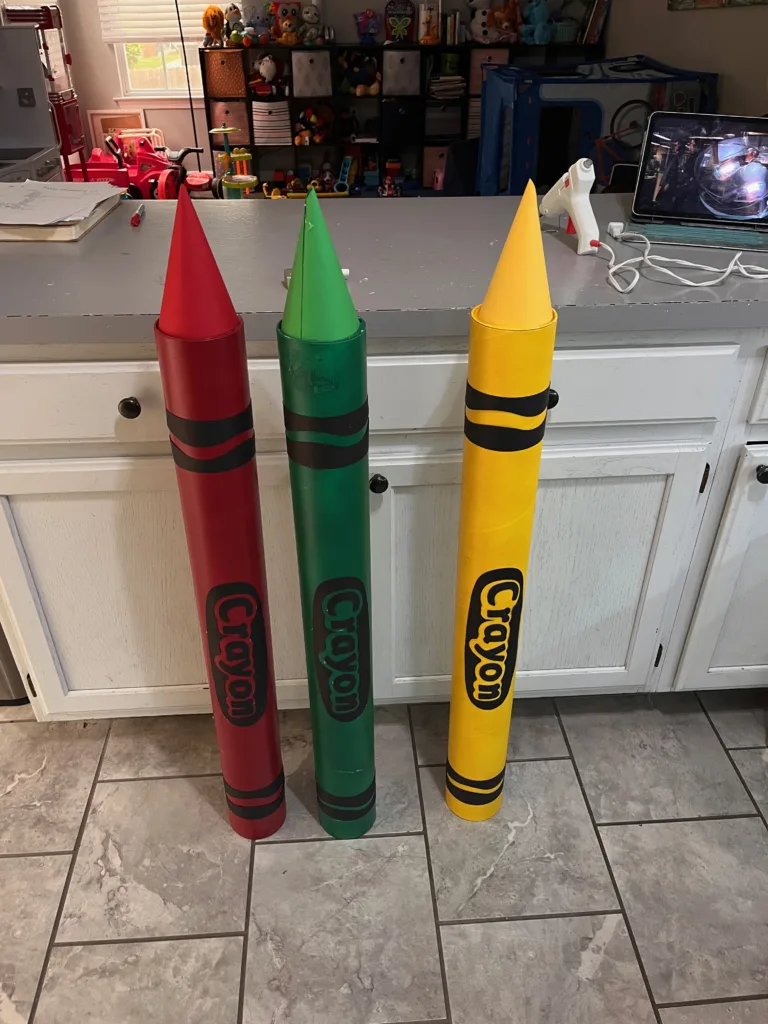
Oversized Crayons – Easy DIY Toy Story Decorations
These oversized crayons were not only a blast to make but also super simple! With just a few materials, you can create eye-catching decorations that add a fun, larger-than-life touch to your Toy Story birthday party.
- Materials Needed:
- Mailing tubes (the sturdier, the better!)
- Spray paint (I went with red, green, and yellow for that classic crayon look)
- Black cardstock (for the crayon bands and letters)
- Hot glue (because what DIY project doesn’t involve hot glue?)
- Scissors or a Cricut machine (Cricut makes cutting a breeze, but scissors work too!)Materials Needed:
- Mailing tubes
- Spray paint
- Cardstock
- Hot glue
How to Make Your Own Giant Crayons:
- 1️⃣ Spray paint the mailing tubes in your chosen colors and let them dry completely. 🎨
- 2️⃣ Cut out the details—crayon bands, letters, and oval shapes—from black cardstock. I used my Cricut machine to speed things up, but you can totally do this by hand!
- 3️⃣ Roll a piece of cardstock into a cone to create the crayon tip, adjusting the width so it fits snugly on top of the mailing tube.
- 4️⃣ Use hot glue to attach everything—secure the crayon tip, wrap the black bands around the tube, and add the letters for that perfect crayon look.
- And just like that—Ta-da! 🎉 You’ve got oversized crayons that’ll make your Toy Story party decor pop! These looked amazing next to our Toy Story balloons and added that playful, toy-sized illusion we were going for.
And just like that—Ta-da! You’ve got oversized crayons that are perfect for a Toy Story-inspired setup.
Pro Tip: If you do a lot of crafting and find yourself cutting by hand all the time, a Cricut machine is a total game-changer! It saves so much time (and spares your hands from all that cutting). Trust me, once you use one, you’ll wonder how you ever crafted without it!
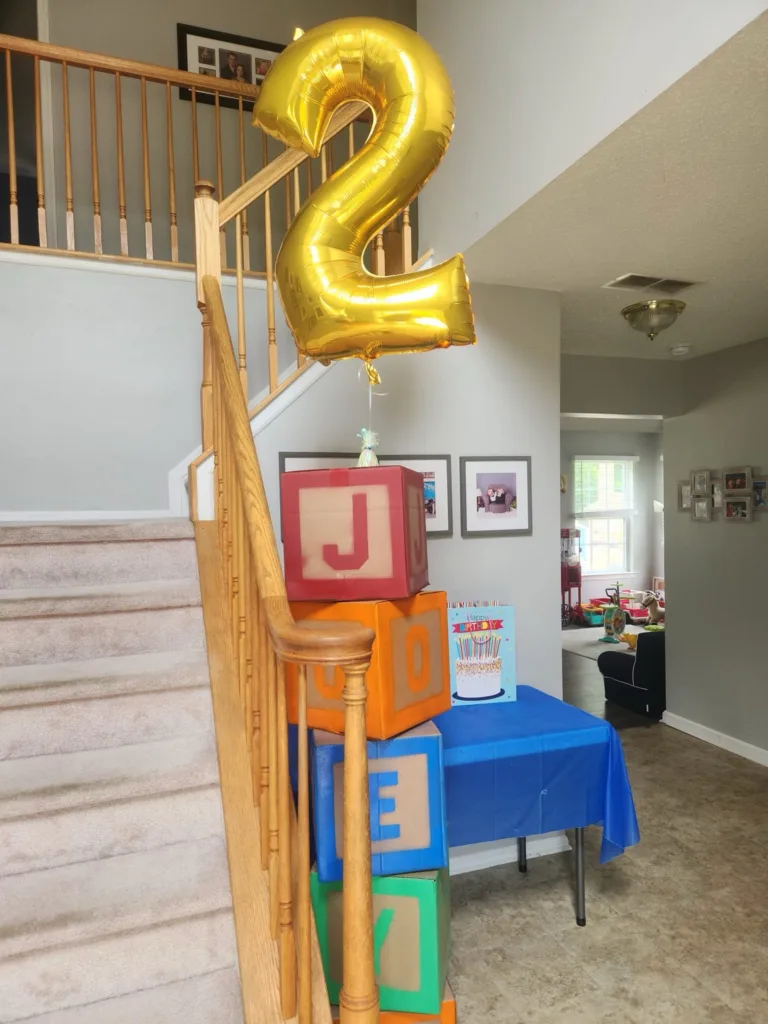
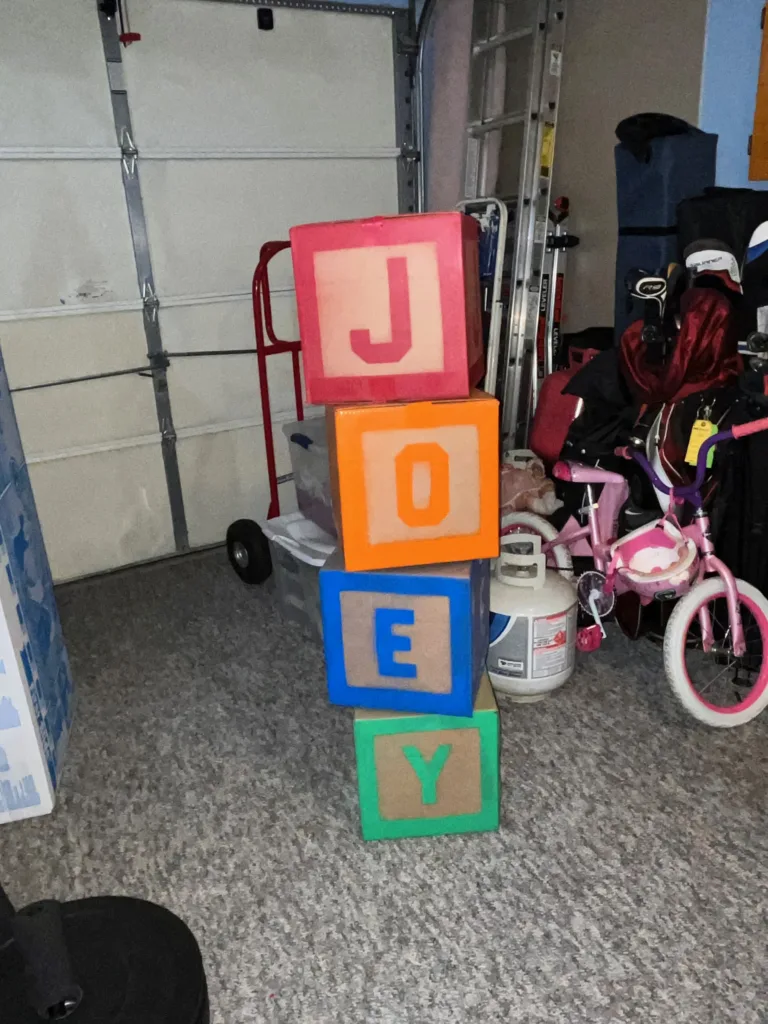
DIY Wooden Block Tower – A Toy Story Party Must-Have
Another super fun (and ridiculously easy!) decoration we made was the wooden block tower—inspired by the classic toy blocks from Andy’s room. These jumbo blocks added the perfect playful touch to our Toy Story birthday party setup. And the best part? You only need three basic materials!
Materials Needed:
- Square cardboard boxes (any size works, but bigger = better!)
- Spray paint (choose bright, Toy Story-inspired colors)
- Cardstock (for creating stencils)
How to Make Your Own Toy Story Block Tower:
1️⃣ Create stencils using a Cricut machine (or cut by hand). I made different designs for each side—some featuring Toy Story characters, others with classic alphabet block letters.
2️⃣ Cut the stencil slightly smaller than the box side to create a nice border effect.
3️⃣ Spray paint the boxes in bold, bright colors. Once dry, place the stencil on top and carefully apply a second coat of paint to create the design.
4️⃣ Stack ‘em up! Arrange your blocks in a tower or spread them around the party area for a fun, oversized toy effect.
🔥 Pro Tip: If you’re cutting by hand, a Cricut machine will make your life so much easier! It speeds up the process, gives you precise designs, and saves your hands from endless cutting. Definitely worth the investment for any DIY party planner!
These blocks were such a hit and looked amazing alongside our Toy Story birthday decorations. Whether you stack them near the dessert table or use them as a playful photo backdrop, they’ll definitely bring that nostalgic Toy Story magic to your party!
Easy DIY Toy Story Activities for Kids
What’s a Toy Story birthday party without tons of fun activities to keep the kids entertained? We set up several games and stations, each inspired by the characters and adventures of the Toy Story crew. Trust me, these activities were a hugehit! Here’s what we included:
- Sarge’s Obstacle Course – Help the kids channel their inner soldiers with an exciting obstacle course! Set up a few challenges like crawling under bent pool noodle tunnels or jumping through hula hoops for that true “Sarge” experience.
- Jessie’s Shooting Game – Inspired by Jessie’s Wild West adventures, this game is perfect for aiming practice! Use a toy gun or bean bags to knock over targets. Below I will show you how we made this game.
- Pin the Tail on Bullseye – A fun twist on the classic “Pin the Tail on the Donkey,” but with Bullseye the horse! Blindfolded kids will try to pin the tail right on Bullseye—who doesn’t love a little friendly competition? I found this game on Amazon, Click here to shop for this game.
- Bubble Station – Nothing says fun like bubbles! Set up a bubble station with wands, bubble guns, and tons of bubble solution for kids to enjoy.
- Bowling for Aliens – Knock down some alien pins in this Toy Story-inspired bowling game. Use soft balls and set up pins that feature your favorite alien characters.
- Piñata – No party is complete without a Toy Story piñata! Fill it with candy and small toys for a big burst of fun. I loved this Piñata, we found it on Amazon, Click here to shop for this Toy Story Pinata now!
These activities were the highlight of the day and kept everyone entertained for hours. Plus, they all added that extra touch of Toy Story magic to our celebration.
If you’re planning your own Toy Story bash, stay tuned as I dive into the details of each game and station. I’ll share step-by-step instructions, tips, and a few secrets to make your party a hit with all the little space rangers and cowboys!
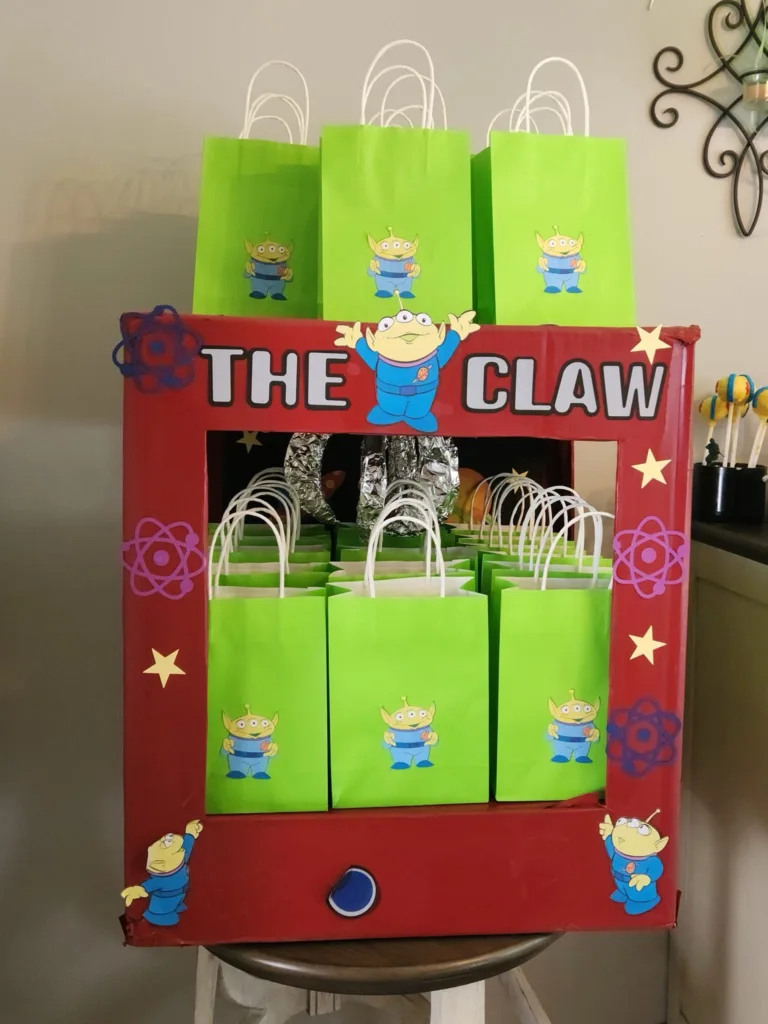
The Claw Machine – A Toy Story Party Must-Have
The claw machine is one of the most iconic elements of Toy Story, so I knew it had to be part of our celebration. It quickly became a centerpiece of the party, and the kids were obsessed! They loved pretending to be like the little green aliens, trying to grab their favorite toys.
If you want to add this fun and interactive element to your own Toy Story birthday party, be sure to check out my detailed guide on how I created this DIY claw machine party decoration. Trust me, it’s easier than it looks, and it’ll definitely be a hit at your party! Check out my post for a step-by-step guide on how I made this: DIY Claw Machine Party Decoration.
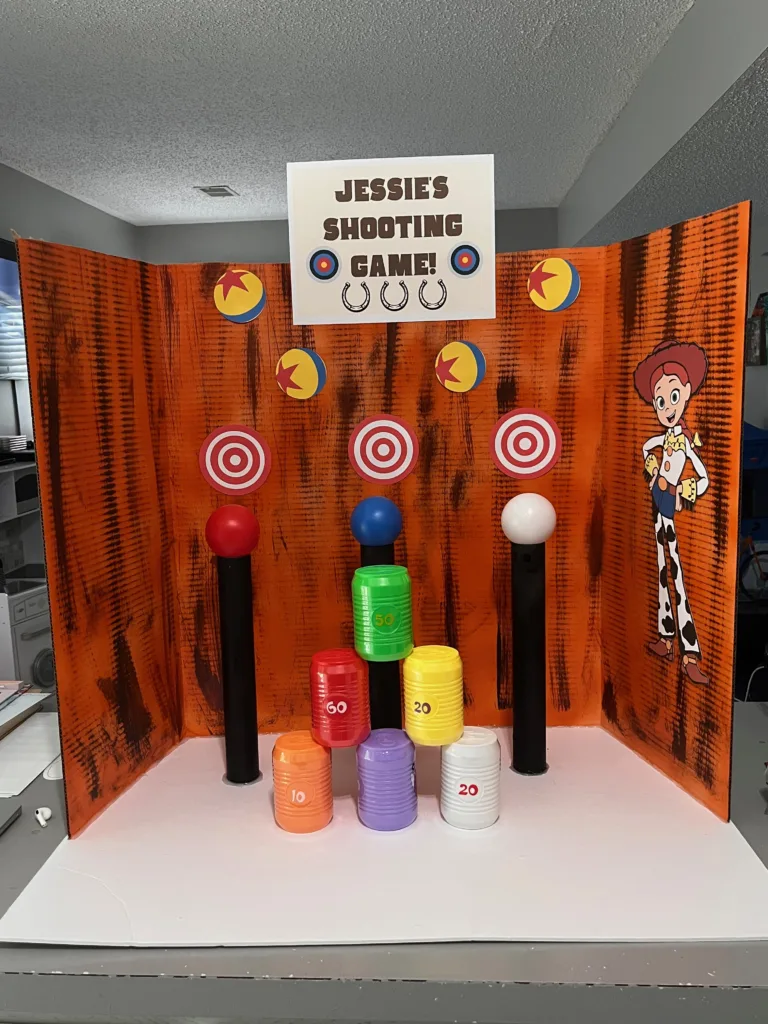
Jessie’s Shooting Game – A Toy Story Birthday Hit!
Jessie’s Shooting Game was a total crowd favorite at our Toy Story birthday party. The best part? This craft was super simple to make, and it didn’t require a ton of supplies—just a few creative touches to bring Jessie’s Wild West adventures to life!
Materials Needed:
- Corrugated tri-fold display board (easy to find and works perfectly for this game!)
- Foam board (for a sturdy base)
- Paint (choose bright colors to match the Toy Story theme)
- Printed cardstock cutouts (featuring Toy Story characters)
- Paper towel rolls (to use as poles)
- Balls and plastic cans (for targets)
Steps to Assemble:
1️⃣ Paint the foam board in fun, vibrant colors. I used shades of red and yellow to match Jessie’s Wild West style. Then, attach your printed Toy Story characters or designs to give it that themed look.
2️⃣ Hot glue the paper towel rolls to the bottom of the board, standing them up as poles for the balls.
3️⃣ Set up Nerf guns with plenty of darts and place the balls or stacked cans on the board as targets. Now, it’s time to shoot!
4️⃣ Let the kids go wild as they take turns trying to knock down targets with their Nerf guns. If you’re looking for a huge bundle of Nerf darts, I highly recommend grabbing one—it’ll keep the fun going for hours!
This game was an absolute hit, and it even sparked a little friendly competition between the adults! Everyone had a blast, and it added that extra Toy Story excitement to our party.
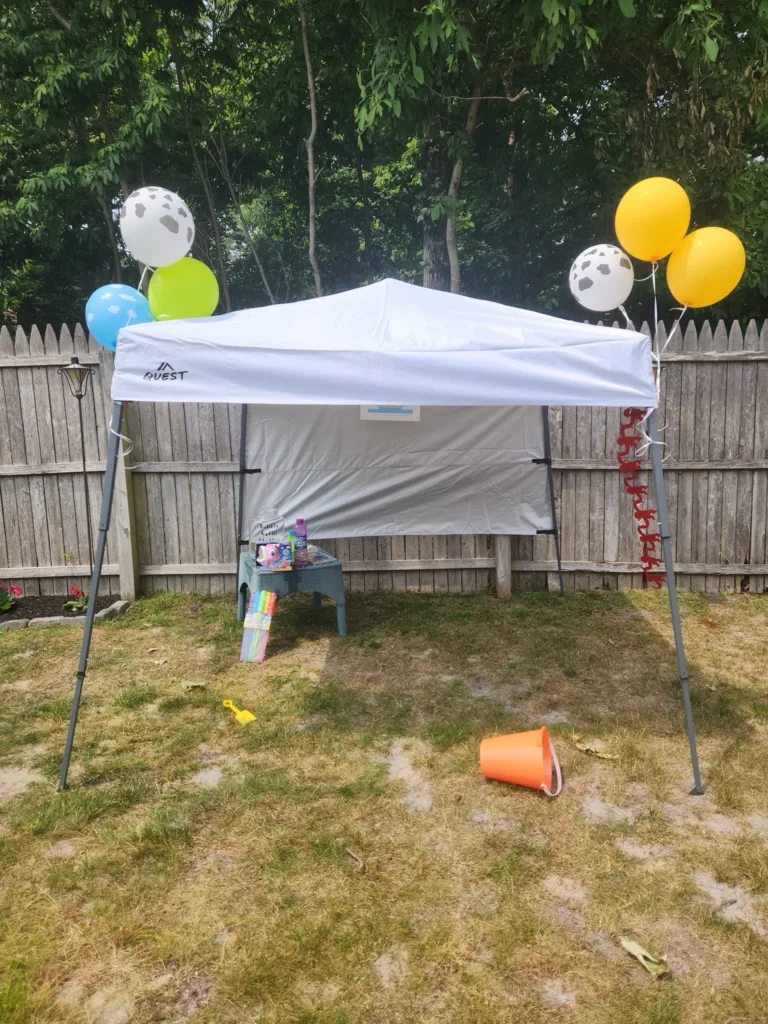
Bubble Station – Sunnyside Daycare Fun!
Kids and bubbles go hand in hand, so of course, we had to have a Bubble Station at our Toy Story birthday party. Inspired by Sunnyside Daycare, this activity was a big hit with all the little ones!
To set it up, I created a small tent labeled “Sunnyside Daycare,” where the magic happened. Inside, I placed a large drink dispenser filled with bubble solution, along with cups and bubble wands for easy refills. It was simple, but the kids had an absolute blast popping bubbles everywhere!
Looking to recreate the fun? Check out this bundle of bubble wands on Amazon to keep the bubble fun going all day long!
Piñata – The Ultimate Toy Story Party Finale!
What’s a Toy Story birthday party without a classic piñata? Instead of filling the party favor bags with candy, we went all out and got a Toy Story piñata from Amazon. The kids were absolutely thrilled, and it was the perfect way to wrap up the party with a bang!
To make sure everyone got a turn and the fun lasted as long as possible, we had the kids line up by age. This way, even the littlest ones had a fair chance to take a swing at the piñata, and the excitement never stopped!
If you’re planning your own party, be sure to grab a Toy Story piñata on Amazon—it’s an essential for any Toy Story bash!
Toy Story-Themed Food and Treats – A Feast for the Whole Crew!
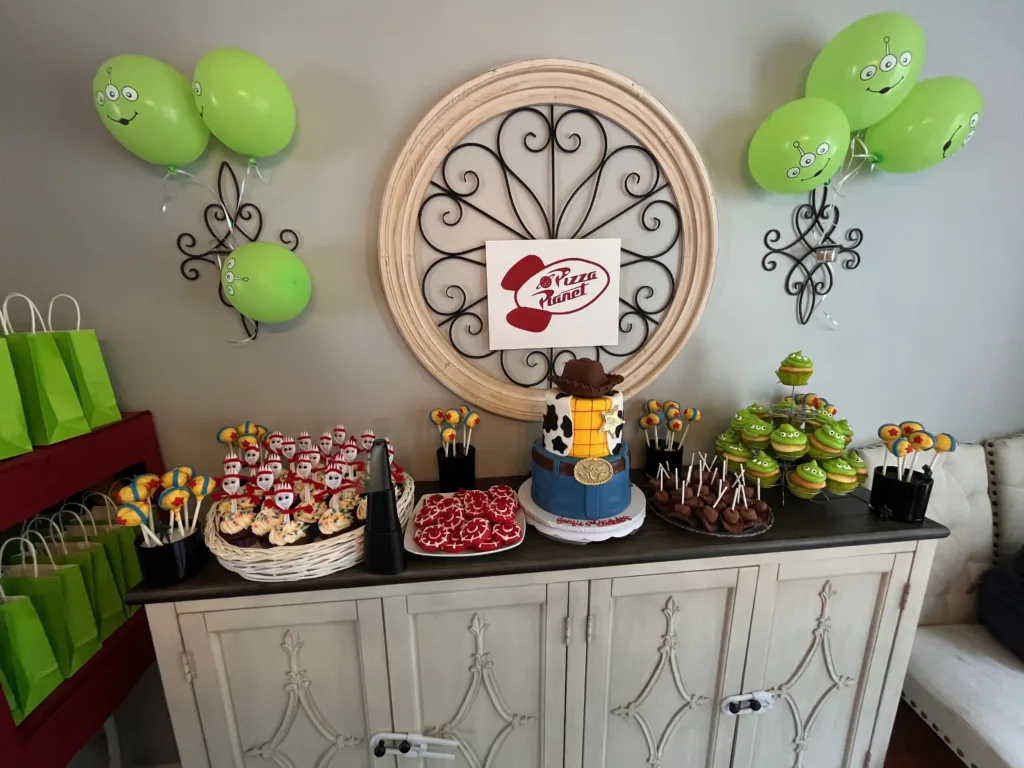
No Toy Story birthday party is complete without some mouthwatering food, right? For our celebration, we transformed the dining room into a Pizza Planet paradise, complete with themed decorations and a spread that had everyone’s taste buds jumping.
For the main course, we kept it simple but delicious with a mix of classic favorites and a little extra flair:
- Pizzas – A variety of toppings to please everyone’s tastes.
- Six-foot sandwiches – Talk about a showstopper!
- Pasta salad – Perfect for a lighter side.
- Tossed salad – Fresh and crisp!
- Chicken strips – A party staple that was devoured by kids and adults alike.
Trust me, the kids were fueled up and ready to tackle the next round of fun activities!
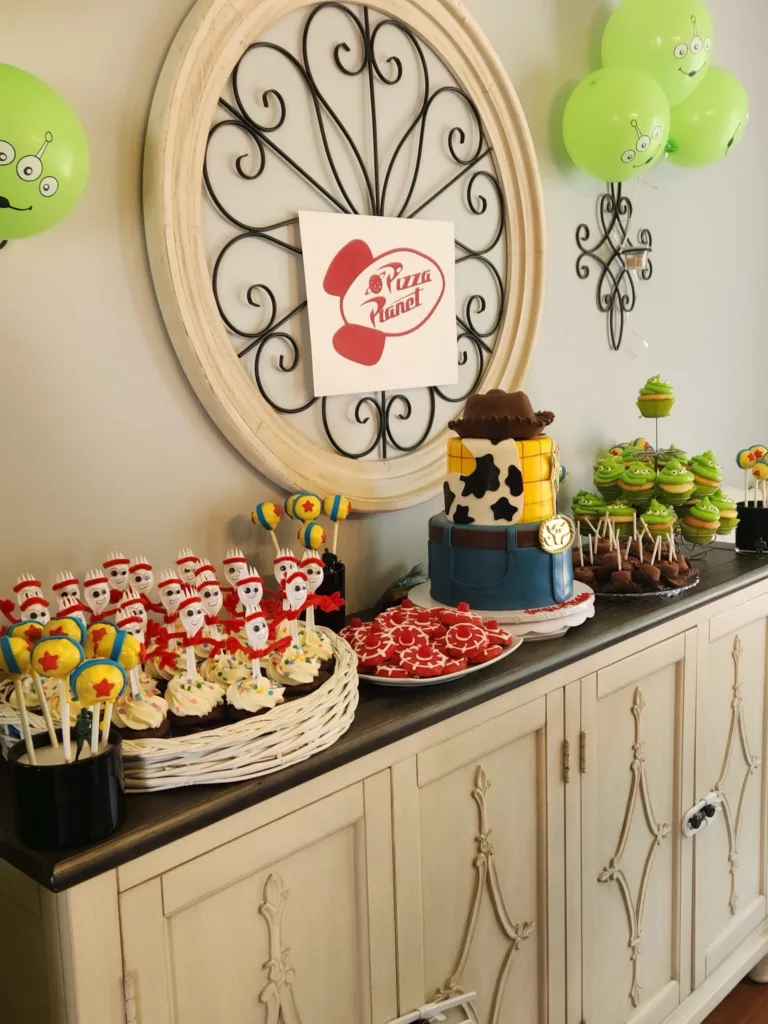
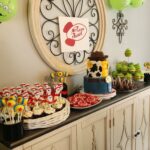
Toy Story Dessert Table – Sweet Treats That Are Out of This World!
The dessert table was where we really let our creativity shine, and it was a total hit with the kids (and adults too!). Here’s a sneak peek at the Toy Story treats we made that stole the show:
Alien Cupcakes – Fluffy vanilla cupcakes topped with vibrant green buttercream and adorable candy eyes.
Woody’s Cowboy Hat Pops – Marshmallows paired with Pringles chips, all coated in smooth chocolate for the perfect crunchy treat.
Jessie Hat Cookies – Delicious shortbread cookies with piped icing and colorful gumdrop toppers, inspired by Jessie’s iconic cowboy hat.
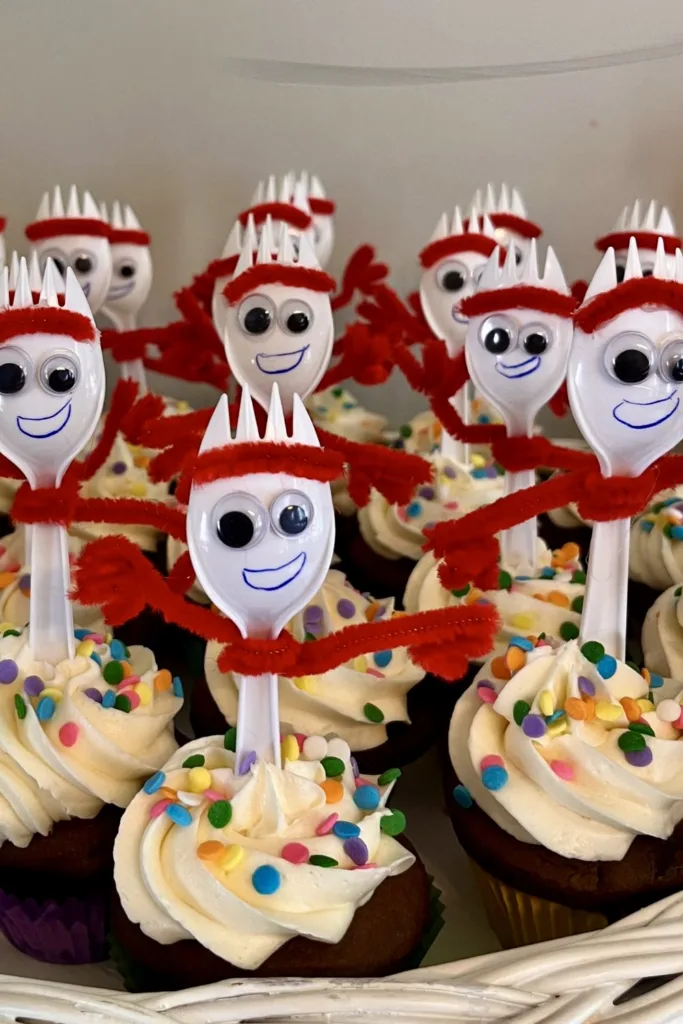
Forky Cupcakes – Sporks transformed into adorable cupcakes, decorated with googly eyes and pipe cleaners for a fun, quirky look.
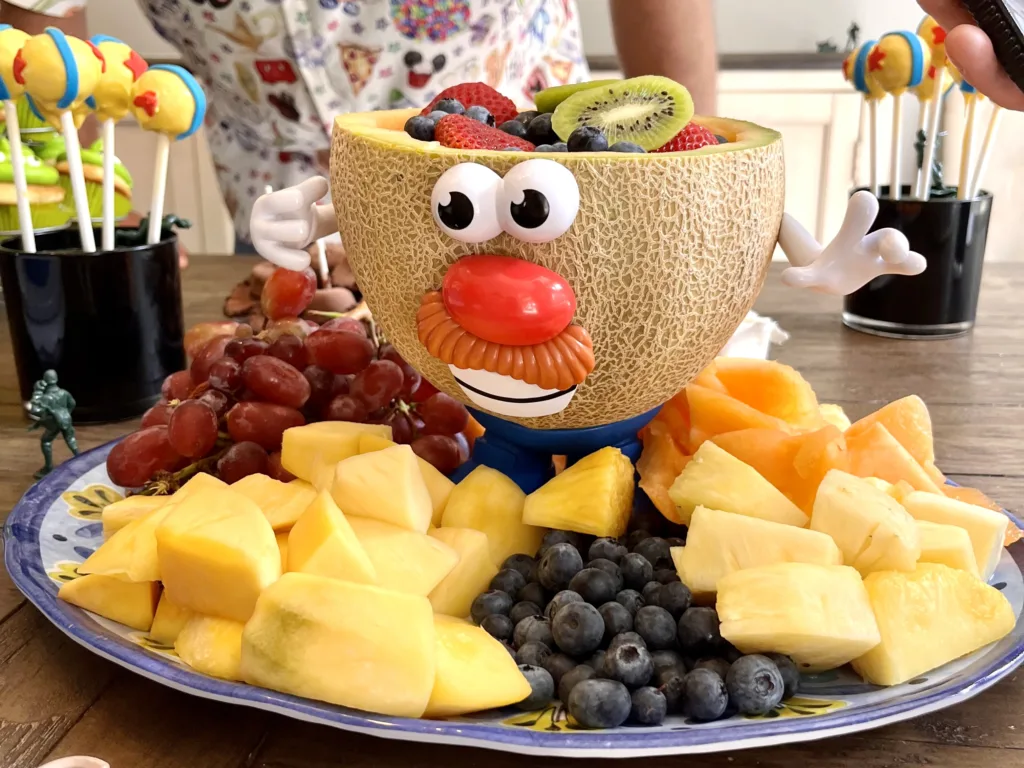
Mr. Potato Head Fruit Platter – A cute cantaloupe bowl surrounded by fresh, colorful fruit—perfect for a healthy snack.
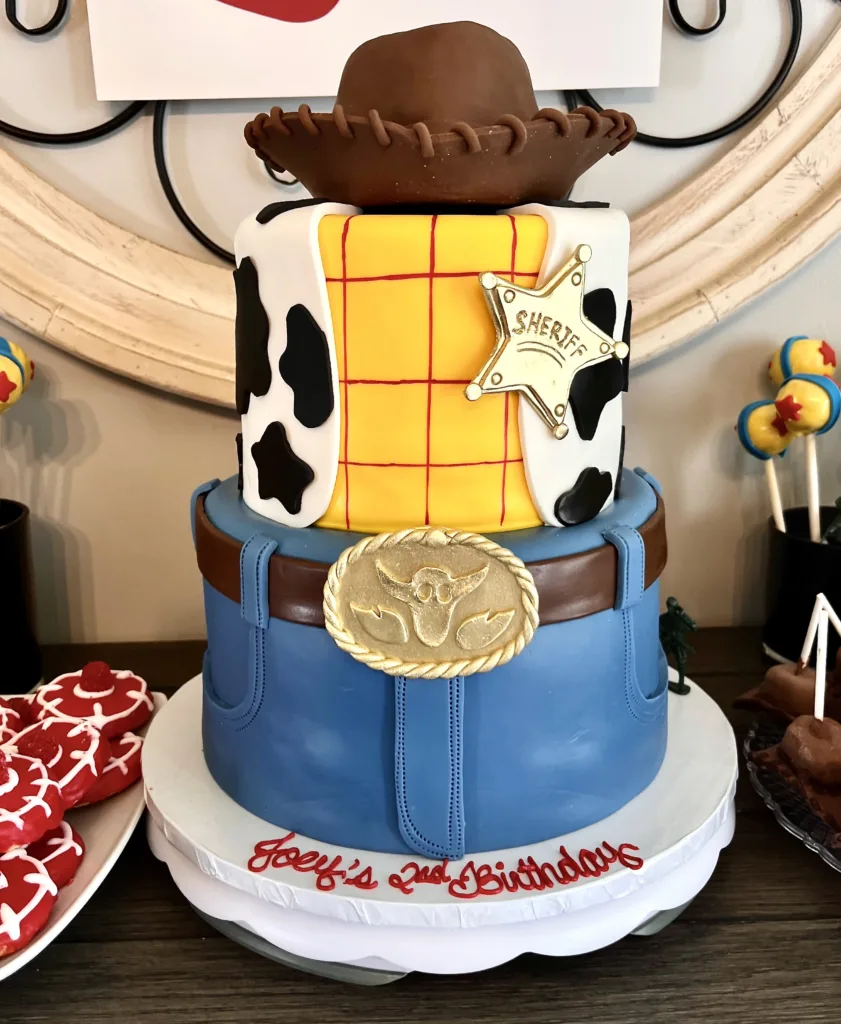
Tiered Toy Story Cake – The showstopper of the day! A gorgeous, multi-tiered cake created by a family friend who’s a professional baker. It featured all our favorite Toy Story characters and made for the perfect centerpiece.
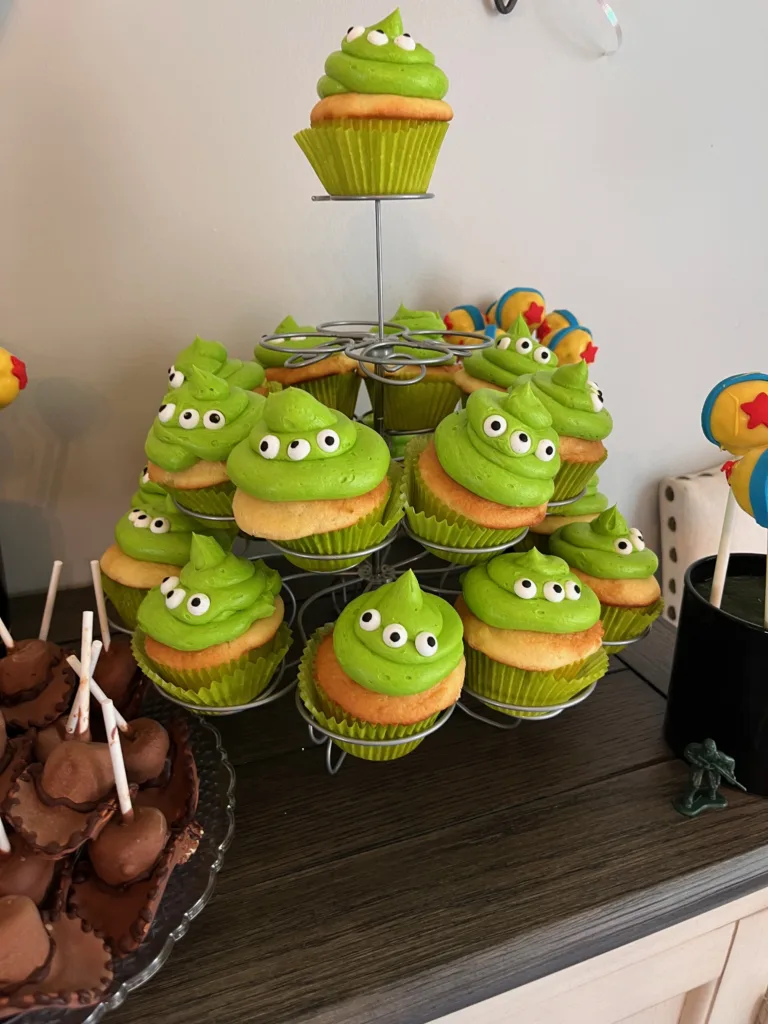
Alien Cupcakes – Out of This World Delicious!
These Alien Cupcakes were an absolute hit! The kids loved them, and they were super easy to make. Here’s how you can recreate these fun treats for your Toy Story birthday party:
Candy Eyes: Place three candy eyes on top to complete the alien face. These add a fun touch and make the cupcakes truly stand out. Click here to find them.
Cupcake Base: Start with your favorite vanilla cupcake recipe (or use a box mix for simplicity).
Green Buttercream: Pipe high, neon green buttercream on top for that bold, alien look! For the perfect shade, be sure to use neon green food coloring—this will give you that bright, out-of-this-world color.
Pro Tip: For the best supplies, head over to Michaels—they have great candy eyes and neon green food coloring that are perfect for this recipe!
These cupcakes not only looked adorable, but they were also a big hit with the kids who couldn’t wait to grab one!
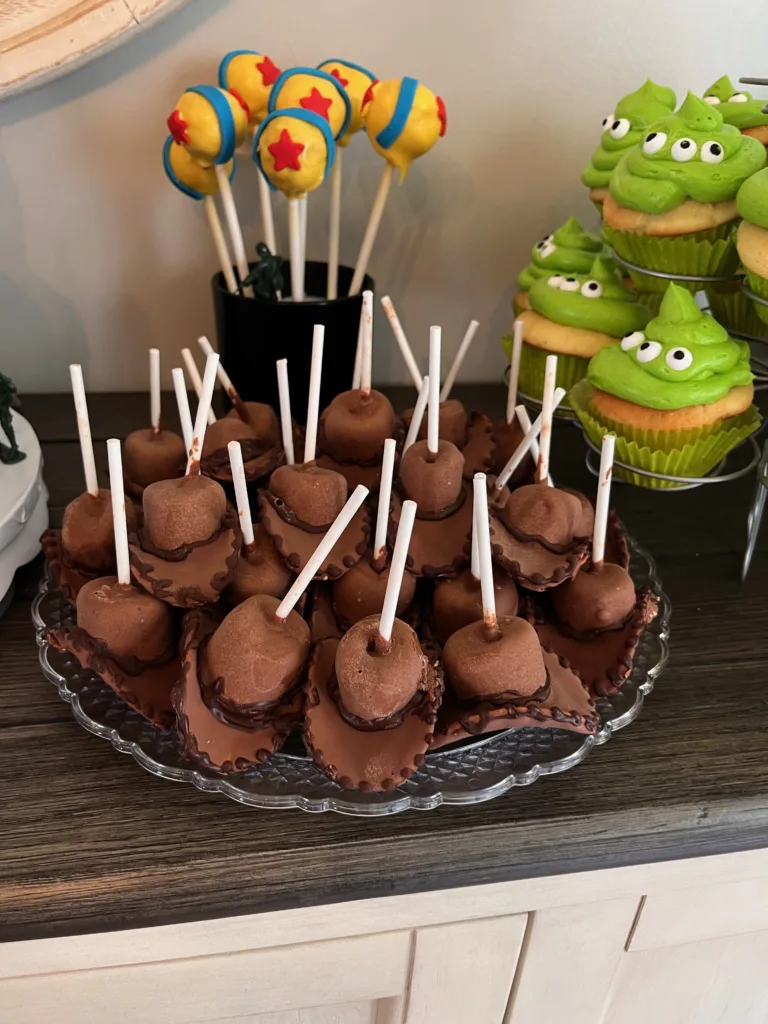
Woody’s Cowboy Hat Pops – A Sweet Treat with a Western Twist!
These Woody’s Cowboy Hat Pops were the perfect snack for our Toy Story birthday party! They’re easy to make, fun to eat, and a total crowd-pleaser. Here’s how you can make your own:
What You’ll Need:
- Lollipop sticks
- Marshmallows
- Pringles chips
- Chocolate (for melting)
Steps to Make:
- Add the Lollipop Stick: Insert a lollipop stick into the bottom of the marshmallow for a fun and easy-to-hold treat!
- Melt the Chocolate: Start by melting your chocolate in a microwave-safe bowl. Be sure to stir it frequently so it doesn’t burn!
- Assemble the Cowboy Hat: Take a marshmallow and dab a little melted chocolate on the bottom to act as “glue.”
- Attach the Marshmallow to the Pringle: Place the marshmallow on top of a Pringle chip, making sure the chocolate holds them together.
These adorable cowboy hat pops were a hit with the kids, and they added a playful touch to our dessert table. Perfect for any Toy Story-themed birthday party!
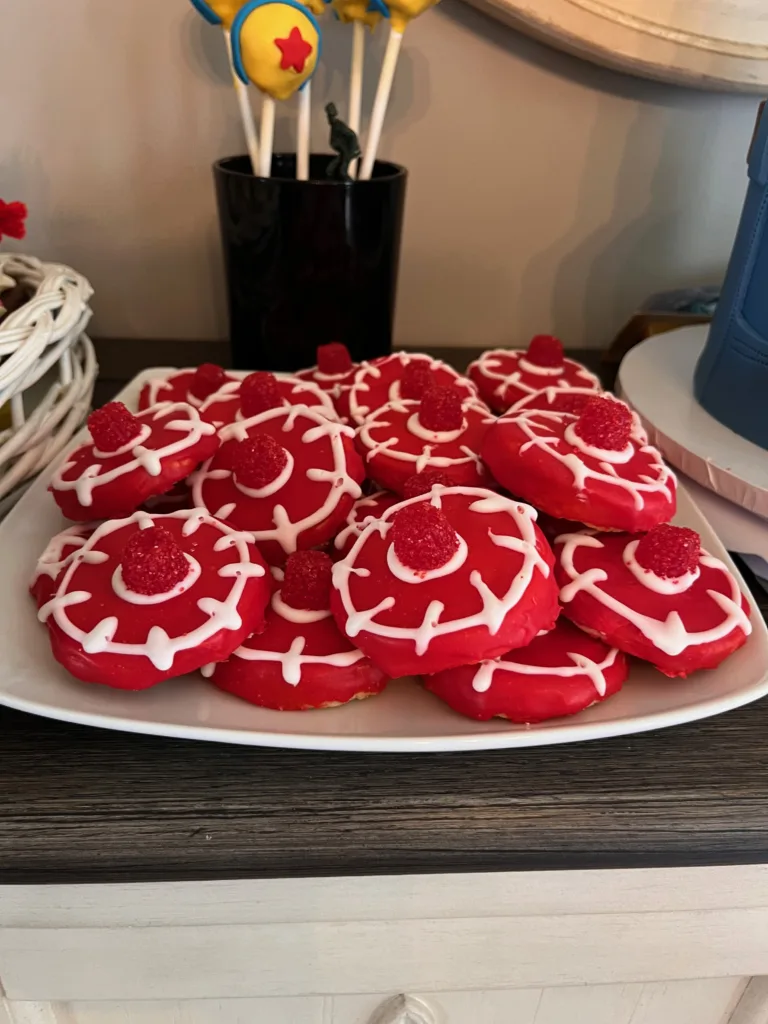
Jessie Hat Cookies – A Sweet Taste of the Wild West!
These Jessie Hat Cookies were a fun, easy treat that added a bit of character to our dessert table. They were simple to make and a perfect match for our Toy Story birthday party theme. Here’s how to make them:
What You’ll Need:
- Shortbread cookie dough (or your favorite cookie dough recipe)
- Red food coloring
- Royal white icing (for piping)
- Red gumdrops (for the hat topper)
Steps to Make:
- Prepare the Dough: Start by making your shortbread cookie dough and adding a bit of red food coloring to give the cookies a bright, vibrant color.
- Shape the Cookies: Once the dough is prepared, roll it out and use a cookie cutter to shape the cookies into the iconic cowboy hat shape.
- Bake and Cool: Bake the cookies according to your recipe instructions, then let them cool completely.
- Decorate with Icing: Once the cookies are cool, pipe royal white icing to create stitching details around the edges of the hat.
- Add the Hat Topper: Finally, place a red gumdrop at the top of each cookie to complete the look.
These Jessie Hat Cookies were the perfect addition to our dessert spread, and they looked just like Jessie’s iconic cowboy hat. The best part? They tasted as good as they looked!
Forky Cupcakes – A Fun, Fork-Tastic Treat!
These Forky Cupcakes were a total hit at the party! Forky is such a fun and quirky character, and making him into a cupcake topper was the perfect way to bring him to life. Here’s how you can make your own Forky cupcakes for a Toy Story birthday party:
What You’ll Need:
- Vanilla cupcakes (or your favorite flavor)
- Plastic sporks (these will be Forky’s “body”)
- Googly eyes (for that adorable expression)
- Red pipe cleaners (to create Forky’s arms)
- White frosting (to help stick everything together)
Steps to Make:
- Bake the Cupcakes: Start with your favorite cupcake recipe. You can use any flavor you like!
- Create the Forky Toppers: Use a plastic spork for the base of Forky’s body. Attach googly eyes with a dab of frosting to give him his signature look.
- Make Forky’s Arms: Cut the red pipe cleaners into smaller pieces, twist them to create arms, and attach them to the spork.
- Top the Cupcakes: Frost your cupcakes with white frosting (this will help the Forky topper stick). Place the completed Forky on top of each cupcake for a fun and cute look!
These Forky cupcakes added a playful touch to our dessert table, and the kids loved them. They were a super cute way to bring a bit of Forky’s charm to the party!
Famous Toy Story Cake Pops – A Sweet and Special Treat!
These Toy Story cake pops are a fan favorite at every birthday! I only make them for my kids’ birthdays, which makes them even more special. For this Toy Story birthday party, I made my signature chocolate chip cake pops, coated in yellow candy melts, and decorated them with stars and blue stripes made from fondant. Here’s how to make your own delicious and festive cake pops:
What You’ll Need:
- Cake pop mix (or your favorite chocolate chip cake recipe)
- Yellow candy melts (for coating)
- Blue fondant (for the stripes)
- Star-shaped fondant (for the star detail)
- Lollipop sticks
Steps to Make:
- Make the Cake Pops: Start by baking your cake pop mix or chocolate chip cake. Once it’s baked and cooled, crumble the cake and mix it with frosting to form the cake pop dough. Roll the dough into small balls and insert lollipop sticks into each one.
- Coat the Cake Pops: Melt the yellow candy melts in the microwave, then dip each cake pop into the candy coating. Let them dry completely before moving to the next step.
- Add the Decorations: Use fondant to cut out star shapes and blue stripes to decorate your cake pops. Attach the fondant using a little bit of melted candy coating as “glue.”
- Let Dry: Allow the cake pops to fully set before serving.
These Toy Story cake pops were the perfect sweet treat for the party and added a fun, colorful touch to the dessert table. Plus, they were easy to eat, making them a huge hit with the kids!

Mr. Potato Head Fruit Platter – A Fun and Fruity Creation!
This Mr. Potato Head fruit platter was one of my favorite creations for the Toy Story birthday party! He was not only adorable but also super easy to make. I used a cantaloupe to create the base, and then added our Mr. Potato Head pieces to bring him to life. The kids loved having a healthy, fun snack, and it was the perfect centerpiece for the dessert table. Here’s how you can make your own:
What You’ll Need:
- 1 cantaloupe (for the base)
- Mr. Potato Head pieces (you can use the ones from the toy or use similar fruit-shaped decorations)
- Assorted cut fruit (to surround Mr. Potato Head)
Steps to Make:
- Create the Bowl: Cut the cantaloupe in half and scoop out the flesh to make a bowl. You can save the extra cantaloupe to add to the fruit platter later!
- Assemble Mr. Potato Head: Use the Mr. Potato Head pieces to create a face and legs. Attach them to the cantaloupe bowl using toothpicks (or just place them in the center if you prefer).
- Surround with Fruit: Place a variety of cut fruit (like strawberries, grapes, and melon) around Mr. Potato Head to fill out the platter.
- Serve and Enjoy: Your Mr. Potato Head fruit platter is now ready to be served at the party!
This Toy Story-themed fruit platter was a fun and healthy addition to the party, and it quickly became a favorite among the kids. It was simple to put together and added a whimsical touch to the table.
Gorgeous Tiered Woody Cake – A Showstopper!
We were lucky enough to have a family friend who is a professional baker, and he made the most gorgeous tiered Toy Story Woody cake for the party. He did such an amazing job, and it was the perfect centerpiece for our Toy Story birthday party! The cake was not only visually stunning but also delicious, and it wowed both the kids and the adults. Here’s a look at this incredible creation:
What Made the Cake Special:
- The cake was designed to look like Woody’s cowboy outfit from Toy Story, complete with fondant details that matched his iconic vest, belt buckle, and hat.
- Each tier was perfectly decorated with Toy Story-themed colors and details, making it the ultimate cake for the party.
- The inside was filled with moist and flavorful cake layers, making each bite just as delightful as it looked.
It was the highlight of the dessert table and definitely set the tone for the whole party. If you’re looking to make your own Toy Story cake, you can always check out professional bakers or find inspiration from Woody’s classic look and style!
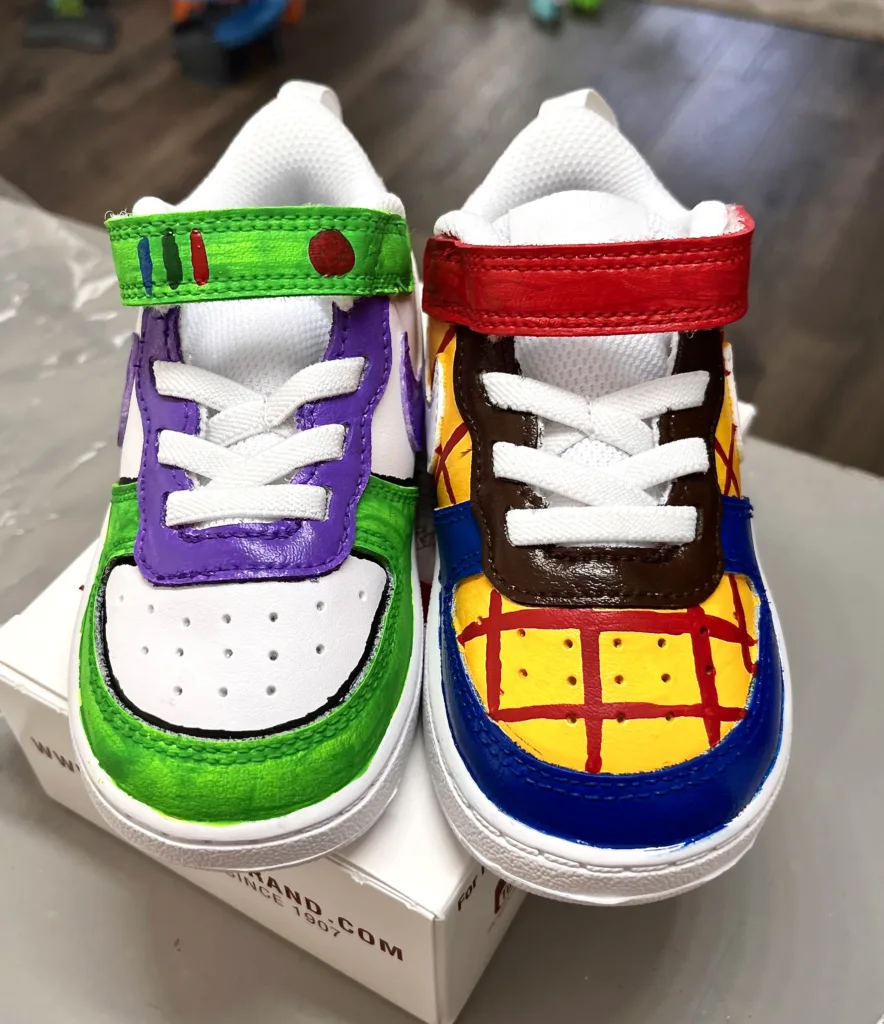
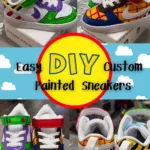
The Birthday Boy’s Outfit – Custom Toy Story Sneakers!
Every birthday kid deserves a special outfit to match the theme of their party, and for our son, I went all out with a custom touch. I hand-painted a pair of Nike sneakers with Toy Story designs, and they were an absolute hit! Not only did they look amazing, but they also made for some great photos. Here’s how I made them:
DIY Custom Toy Story Sneakers:
- Materials Used: A pair of plain white Nike sneakers, fabric paints, paintbrushes, and Toy Story-themed designs.
- I carefully painted iconic Toy Story characters like Woody, Buzz, and Alien on each shoe. It was such a fun project, and the end result was totally worth it!
If you’re looking to create your own custom Toy Story sneakers for your child’s birthday, be sure to check out my DIY Hand-Painted Toy Story Sneakers post for a step-by-step guide on how to do it yourself.
These sneakers were a fun and personalized touch to our Toy Story birthday party, and they really made the birthday boy feel extra special!
Final Thoughts: Creating Magical Toy Story Birthday Memories
Thank you so much for joining us on this journey through our “Two-Infinity and Beyond” Toy Story Birthday Party! I hope you found plenty of inspiration to help you plan your own out-of-this-world celebration. Whether you’re looking for fun DIY decorations, creative games, or delicious treats, I’ve got you covered with everything you need to make your party truly unforgettable.
Don’t forget to check out my other posts for more fun party ideas, and happy planning! May your party be as fun as a trip to Pizza Planet and as magical as a ride with Buzz Lightyear!


[…] Toy Story Birthday Party! Two-Infinity and Beyond! […]